Showing posts with label christmas book. Show all posts

Friday, November 19, 2010

Thanksgiving to Christmas

I LOVE Thanksgiving, and I fully believe in embracing all the Thankfulness, football, turkeys and pilgrims that come along with it. But I always find myself a little antsy about Christmas this time of year as well. As soon as Starbucks breaks out its Red Christmas cups.... it's official. The Holidays are here.


So what I end up doing is having a little mix of both in my house. Christmas music playing while the kids color turkeys. Red Pointsettas sharing a flower pot with mums.


I made this appetizer for a party we had last weekend, and I love the way it transitions from Thanksgiving to Christmas. Cranberries, apples, cinnamon... those ingredients are fair game for a Thanksgiving appetizer, but will transition perfectly into Christmas as well. So put this one in your recipe file to use up over the coming weeks!


Baked Brie with Cranberries and Apples


Preheat oven to 350


1 round of Brie (about 4 inches in diameter)

1 medium apple

a handful of dried cranberries

2 tsp cinnamon (love the Pampered Chef Cinnamon, its the same one Cinnabon uses)

2 tablespoons brown sugar

Sliced Almonds

Wheat thins for serving


OH and... left out a really healthy ingredient. Just 2 tablespoons of butter. :)

Melt the butter in the microwave, then mix in the cinnamon and brown sugar
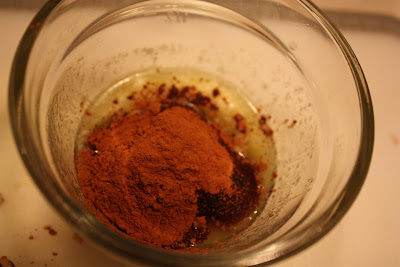

Steer it up

Chop your apples real small, and if you have a food chopper, you're really happy right now.

Add in the brown sugar/butter mix, the almonds, and the cranberries and give it a stir
Then slice the Brie in half lengthwise


Put the bottom half cut-side up... this was perfect on a round stone but you can use a cookie sheet too.


Scoop half the apple mix on top

Put his hat on


And scoop the rest on top! At this point, if you were traveling, you could wrap the Brie up in aluminum to transfer it to your party.


Bake for about 15 minutes or until gooey. I served it on the round stone and put wheat thins all around it.
Sadly, I have no "after" pictures, because my family stood next to this appetizer like vultures and devoured the entire thing!!

Monday, August 2, 2010

Hey Hey its My Birthday

August 2nd. Today I turn 25. Yes I know, I'm a baby and I generally don't like to tell people my age but with each passing year, I become more comfortable with and thankful for God's plan to kick start my mom years. It's funny though because I realized this morning I'm not overly estatic for my birthday as I have been in years past. Normally I'm known for being semi-obnoxious about it by plannning events for nearly the whole week, and using the "its my birthday" card with my husband in every possible instance.

I realized this morning what has changed in my 25th year is that for the first time I feel an enormous sense of inner peace. I'm not looking to the future for better days, and I'm definitely not nostalgic for the past, I am one hundred percent satisfied with the here and now. I don't need to do something today to make it extra fun and special, because I truly feel blessed with fulfilled with what my normal day holds.

I got to rise with the sun this morning and go on a run with a friend.

I came home to three healthy, sweet, adorable children.

I got to kiss my handsome husband who works so hard to give us a great life.

What else do I need? Not much.

Except maybe mexican for lunch. And for Breyers to be on sale :)


Anyway, this is another delicious recipe from the kitchen of Judy DelliColli! I stopped by her house last week and she was kind enough to clear out her vegetable garden for me! By August, the normal old hamburger and hotdogs on the grill are getting tiresome. Here is a great and super easy way to spice up your burger.


Teriyaki Burgers


1 pound ground beef or turkey

About 1/4 cup teriyaki sauce (this ones from TJ's)

About 3 tbl soy sauce

Chopped/Pressed garlic

chopped fresh green onions

chopped or grated finger, about 1 tbl

hamburger buns


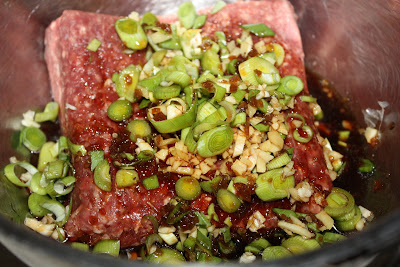
Simply add the soy, teriyaki, green onions, garlic and ginger to the meat in a bowl and mix well.


I had to stop and take a picture of what was going in in my house while I was making this. I don't want my posts to fool you into thinking I actually have things under control over here with three kids under 5. Yes, that is Batman riding a pink bike, naked, through the house.


Form into patties, top with some freshly ground pepper and refrigerate until ready!


Here are the fresh salad greens and quirky little yellow tomatoes from Judy's garden I was excited to use. I love eating homegrown/local!!
Thought these greens would go perfect with ginger dressing, you can get this in the Asian section at most grocery stores!


Then, because I like a little green in every meal, I threw the salad on top of the burger. The ginger dressing and the crunchy greens were the perfect addition.

Tuesday, July 20, 2010

Hard Work Pays Off

Last Tuesday night I laced up and headed out for my first track workout of the season with my local running club. Oh, I have such a love/hate relationship with the track. I dread the workout all day long, cursing myself for signing up for such a thing. Then once I get the workout underway I'm reminded how much I love pushing myself. How great it feels to do something you didn't know if you could even do. How nostalgic it is to smell the rubber and feel the heat of the track while nearby coaches bark orders and blow whistles at football practice. And most of all, how rewarding it is to do something hard, and have it actually pay off.

Track workouts are hard, but they are so important if you want to take your running to the next level. Even more important than that for me, they help to break up the monotony of weekly runs. It can get pretty boring to go out there every day to push out the same old 4 to 6 miles. Track workouts shake it up, give you one day where you push yourself just a little harder, and in my case, reward myself juuuust a little more. Immediately after finishing this weeks track workout, which by the way was in the pouring down rain, I was feeling pretty badass so I took myself over to Giant for a fresh carton of chocolate ice cream. Its a good thing I love to run, because I suuuure do love to eat. :)

So here is the other indulgent, sinfully delicious recipe I mentioned a few posts ago. Similarly, this recipe is a LOT of WORK but it is worth every effort!!!! My girlfriend brought over these chicken enchiladas after I had TGB and oh my goodness, I fell in love with the sauce immediately. I put my own little spin on them, but kept the sauce the same. This dish is a definite crowd pleaser. The sauce is savory and rich but not at all spicy, so its perfect to please a large group. And always an added bonus, you can make this the night before!

The Best Chicken Enchiladas You've Ever Had

6 chicken breasts, cooked and shredded (I poached these in water and shredded the day before to make the assembly a little less burdensome the next day)

About 12 corn tortillas

vegetable oil for frying

your favorite brand of jarred salsa

About 4 oz of shredded jack cheese and 4 oz of shredded cheddar


For the sauce:
2 cups of chicken broth
1/2 cup sour cream
1/2 stick of butter
At least a 1/2 cup of tightly packed cilantro
1 tbl cumin
2 tbl flour


(Its pretty funny I thought light sour cream might make this any less fattening. Especially since its sitting next to that giant slab of butter)


In a blender add the chicken broth, cilantro, sour cream and cumin. Blend until smooth.

Meanwhile in a saucepan over medium heat, melt the butter over low heat (I doubled the recipe, so there's a lot more butter in here than half a stick if youre wondering). Whisk in the flour until smooth.

Like so :)


Then pour in the cilantro sour cream mix from the blender and whisk it up from time to time as it thickens over the low heat.


Get everything ready for frying... corn tortillas, veggie oil, a piece of aluminum foil, and you'll need some tongs too! Get someone to watch your kids (even if its the TV) because this part is kind of time sensitive. And by the way, don't even bother making these enchiladas at all if you're going to skip this step! If you just put the chicken in the corn tortillas without gently frying them first they will fall apart when you go to serve them.

Add a thin layer of oil to a hot hot pan, and fry the corn tortilla for just maybe 10 seconds per side so that its slightly crispy but still bends without breaking.
Then pick up the corn tortilla with the tongs, shake off the excess oil, and dip both sides in the sour cream sauce. Then transfer to the aluminum foil.

Repeat this with each tortilla until you've done as many as you want to make!


And now finally its time for assembly. Arent you happy you cooked the chicken the day before?? Make you assembly line... I've got the tortillas, chicken, then salsa, then cheese, then baking dish.


Put a bit of chicken, a spoonful of salsa, and some cheese in the tortilla.


Then fold and put open-side down in the baking dish.

Then pour alllll over the magic sauce...


And top with even more yummy fattening cheese! Just do it! You've already come this far!

Then bake at 350 for 30 minutes until the top is hot and bubbly. Oh my.
And finally, the last parallel I'll draw for you today, if you love all things running check out my girlfriend Dorothy's blog. She is the definition of Hard Work Pays Off and chronicles her inspiring journey through her Mile Posts entries. She was kind enough to do a little athlete bio on me today!

Monday, April 5, 2010

Pulled Pork Part 1 of 3

Okay, this series of recipes I'm going to post over the next few days utilize my absolute favorite things... using the crockpot (because it does all the work for you) and making several meals out of one. I LOVE THAT!! I feel like any subsequent meals you get after the first one are basically free.

I was really excited about this too because I got the pork shoulder from the Home Farm Store. It was $6.99 a pound which is definitely steep for pork shoulder, BUT I got three meals out of it, so it was totally justifiable.

Southwestern Pulled Pork Tacos

1 can of black beans (rinsed and drained)

1 can of corn (drained)

2 pounds of boneless pork shoulder

1 jar of salsa

2 tbl of oregano

2 tbl of chili powder

2 tbl of unsweetened cocoa powder

Smother allll the ingredients (except corn and black beans) on the pork. I know... it looks kinda nasty. Now go away and let the crock pot work its magic for 6-8 hours on low heat.

When its ready, take it out, cut it in half and scrape off the seasonings from one half. Stick that in the fridge for another nights meal!!


Then shred what is left. Shred, rough chop, whatever you need to do to get the job done.

So it looks like this...

Then add the corn and black beans into the crock pot with the salsa-y goodness

Add the pork back in.... yummm
Serve it up in a corn or flour tortilla with your favorite taco toppings! (My personal fave, guacamole... avocados, lime juice, salt, garlic powder, onion, tomato, chopped fresh jalapeno and cilantro... mmmmm so good).
So I still had a TON of the pork leftover after we ate. I put what was left in a container and froze it and actually used it up tonight in Enchiladas. I'll post that too!

Sunday, February 28, 2010

No Meat Fridays

Up until Easter many will be observing the Lenten season by abstaining from meat on Fridays. Its our way of relating to Christ during the 40 days and nights before Easter, where Jesus fasted in the desert before His death and ressurection. Growing up this meant a lot of cheese pizza on Friday! That will always be my favorite Lenten meal. In my husband's family it was either cheese pizza or tuna noodle casserole. I liked this combination of Salmon and Alfredo sauce because it felt like a grown up version of "Tuna Noodle."

In other news I hit the 30 week mark this weekend! I'm excited to be in the "home stretch" but I also know how the last 10 weeks seem to creep by so slowly compared to the first 30. If I can continue running through March I will be very happy. So far its not too uncomfortable yet but I'm also expected to grow 1 centimeter and 1 pound per week from here on out... meaning my runs will morph into walks over the next two months! I'm ok with that but would really appreciate some warmer weather come April from Mother Nature!


Thanks to Jen Sanders for the lightened up Alfredo Sauce recipe and therefore the inspiration to put this together! You can also put the sauce with chicken, veggies like broccoli or peas, whatever you want! According to Jen, Chicken and Alfredo is a hit with her little guy.

Salmon with Lightened Up Alfredo Sauce


Rotini pasta (or pasta of your choice!)

1 cup 1% or fat free milk and 1/4 cup whipping cream (or, in Jen's original recipe, 1 cup half and half and 1/2 cup fat free milk - I had no half and half so just made this substitution).

2 tablespoons flour

1/8 tsp ground nutmeg

1 to 2 tablespoons butter

2 garlic cloves, minced

1/4 to 1/2 cup freshly grated Romano

2 tablespoons freshly chopped parsley or 1 tsp dried parsley and fresh basil is yummy too if you have it!

salt and pepper

(1 little boy's head, as pictured, is not necessary :) )


For the salmon:
2 tablespoons white wine
1 tablespoon olive oil
chopped basil leaves
squeeze of lemon juice (pictured above)
salt and pepper
Begin by cooking your pasta and preheating the oven to 400. Mix all the ingredients for salmon marinade and top salmon with it. When oven is ready stick the salmon in for 12 minutes or until it flakes easily with a fork.


In a bowl whisk flour, milk, whipping cream, and nutmeg.
Melt the butter in a saucepan over medium low. Add garlic and saute for a minute or two. Do not let the butter burn! Pour in the milk mixture and stir gently.

Add in the freshly grated parm

Continue to stir gently as sauce thickens (only takes about 3 minutes or so) and then add parsley, I added some basil too. Just a dash of salt and pepper - the parm is naturally very salty so bear that in mind!


Salmon is done! Remove from the oven and let it sit for a bit.


Fold the cooked pasta in with the sauce. Put the salmon on top.


Break the salmon up with a fork and toss it all together!